How to Zero the ATN ThOR LT 320 in One Shot:...

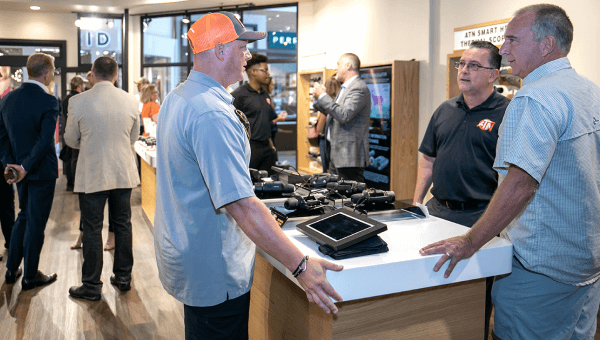
If you picked up the ATN ThOR LT 320 as your go-to thermal optic, you already made a smart call. It consistently ranks as the best thermal scope under 1000 for hunters who want real performance without breaking the bank. But even the best optic is useless if it is not properly zeroed. A bad zero means missed shots, wasted ammunition, and worst of all, wounded game walking away in the dark.
This guide walks you through exactly how to zero the ATN ThOR LT 320 in one shot using ATN's built-in zeroing system. We are talking step-by-step, no guesswork, no second box of shells burned through at the range. Follow this process and you will be dialed in and ready for the field before the sun goes down.
Why Zeroing a Thermal Scope Is Different From a Traditional Optic
Before we get into the step-by-step process, it is worth understanding why zeroing a thermal scope setup guide approach differs from zeroing a standard daytime riflescope. With a traditional scope, you adjust the reticle to match where the bullet impacts using real-time visual feedback through glass. With a thermal scope, everything is digital. The image on your display is generated by heat signatures detected by the sensor, and the reticle is rendered digitally over that image.
That means you cannot use a traditional bore-sighting method with a laser bore sighter the same way. More importantly, the ATN ThOR LT 320 has a purpose-built digital zeroing system that takes advantage of the digital nature of the scope. When you know how to use it, you can achieve a precise zero with a single round downrange. That is not marketing language. That is how the system is designed to work.
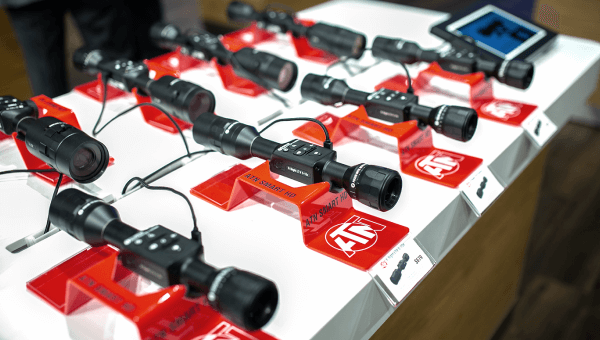
ATN ThOR LT 320 Review 2026: What Makes It Worth Zeroing Right
Understanding your gear before you zero it matters. A quick ATN ThOR LT 320 review 2026 rundown helps frame why the zeroing system on this scope is both accessible and effective for hunters at every skill level.
The ThOR LT 320 delivers a 320x240 thermal sensor resolution with a 12 micron pixel pitch and a 60Hz refresh rate that keeps motion smooth during target tracking. It runs on a single 18650 rechargeable battery for up to 10 hours, meaning you are not going to lose power mid-hunt after spending time getting zeroed. The scope features a streamlined 3-button control interface that makes navigating menus intuitive even with gloves on in cold field conditions.
One of the standout features relevant to zeroing is the built-in One Shot Zero system. This is not a gimmick. ATN engineered this specifically so hunters do not have to burn a box of ammo figuring out adjustments manually. Fire one round, identify the impact point on your thermal display, use the interface to move the reticle to match that impact, and you are done. Combined with the Zeroing Freeze feature available on ATN's more advanced ThOR 6 platform, this approach to zeroing is one of the most refined in the thermal optics category.
The ThOR LT 320 also supports multiple weapon profiles, so once you zero it on one rifle, you can save that profile and switch to a different firearm without starting over. For hunters running multiple setups across a season, that is a serious advantage.
ATN ThOR LT 320 Specs: What You Need to Know Before You Zero
Reviewing the ATN ThOR LT 320 specs relevant to zeroing will help you set realistic expectations at the range and avoid common setup mistakes.
- Sensor Resolution: 320x240 at 12 micron pixel pitch
- Refresh Rate: 60Hz for smooth, clear target tracking
- Display: High-resolution OLED for crisp reticle visibility during zeroing
- Digital Zoom: Multiple zoom levels to help you identify bullet impact during zeroing
- Reticle Types: Multiple styles available, choose one with clear center reference for zeroing
- Weapon Profiles: Supports multiple saved profiles so you zero once per rifle
- Battery Life: Up to 10 hours on a single 18650 cell
- Waterproof Rating: IPX7, so weather is not an excuse to skip zeroing in the field
- Mounting: Standard 30mm rings, not included
Understanding these specs matters because zeroing at the right distance and in the right conditions will get the most out of what the sensor and display can show you. The 320x240 resolution is excellent for identifying impact points at practical zeroing distances, particularly when you use the digital zoom to inspect your target after the shot.
What You Need Before You Start
Getting your zeroing session right the first time means having everything prepared before you pull the trigger. Showing up to the range unprepared is how you end up firing twenty rounds and still going home with a scope that is off. Here is what you need ready before you begin your thermal scope setup guide session with the ThOR LT 320.
- A stable shooting platform, bench rest or bipod with rear bag support
- A thermal zeroing target or a heat-generating target pad that will show up clearly on the thermal display. ATN includes a heated target with ThOR 6 series scopes, and similar options are available as aftermarket accessories for the LT series
- Ammunition you plan to hunt with, not a substitute load. Zero with what you shoot
- A fully charged battery installed in the scope
- The scope properly mounted and torqued on your rifle before heading to the range
- Access to ATN's mobile app if you want to use the Wi-Fi streaming feature to view your shot on a phone or tablet screen during zeroing
On the target question: thermal scopes do not see physical bullet holes the way your eye does through a traditional scope. They see heat. A fresh bullet hole in a cardboard target will retain heat briefly from the friction of impact and show up on a thermal display, but the contrast fades quickly. Using a proper thermal zeroing target, one that retains or generates heat contrast, gives you a much cleaner reference point during the zeroing process. This is the single biggest mistake hunters make when trying to zero a thermal scope for the first time.
Step-by-Step: How to Zero the ATN ThOR LT 320 in One Shot
This is the core of the how to zero thermal scope process. Follow these steps in order and do not skip ahead. Each step builds on the last.
Step 1: Mount the Scope Correctly
Before anything else, the scope needs to be properly mounted. Use quality 30mm rings matched to your rail. Torque the ring caps to the manufacturer's specification, typically between 15 and 20 inch-pounds for most mounting systems. Do not over-torque and do not under-torque. A loose mount will ruin your zero before you ever fire a shot, and an over-torqued mount can damage the scope body.
Once mounted, check that the scope is level. Even a small cant in the scope housing will cause your point of impact to shift left or right at distance. Use a level tool on the scope body and compare it to a level reference on your rifle's action or rail. A few minutes here saves you significant frustration downrange.
Set your eye relief so you have a full, clear view of the OLED display without having to push your eye uncomfortably close or crane your neck. The ThOR LT 320 is designed for comfortable eye relief that keeps your face safely away from the eyepiece under recoil.
Step 2: Power On and Select Your Weapon Profile
Power on the ATN ThOR LT 320 using the power button. Allow the scope a moment to complete its startup sequence and warm up to a stable operating state. Wait approximately 30 seconds before beginning any setup work to allow the thermal sensor to stabilize. A sensor that has not reached thermal equilibrium can produce a slightly inconsistent image that makes it harder to read your zero accurately.
Navigate into the main menu and select or create the weapon profile you want to zero. If this is a new rifle or caliber, create a fresh profile and name it clearly. The ThOR LT supports multiple profiles, so keeping them labeled by rifle or caliber prevents confusion during future sessions.
Within the weapon profile setup, you will enter basic information about your firearm and zeroing distance. Select your intended zero distance. For most hunters using the ThOR LT 320 for hog, coyote, or predator hunting, a 100-yard zero is the standard starting point. If you are hunting primarily at longer ranges, you may prefer a 200-yard zero, but 100 yards is recommended for the initial zeroing session, especially if this is your first time zeroing a thermal scope.
Step 3: Set Up Your Thermal Target at 50 Yards
Here is a technique that makes the one-shot zero process dramatically more reliable: start at 50 yards rather than 100 yards for your initial shot. At 50 yards, the bullet impact will be much easier to identify on the thermal display, and the relationship between your reticle position and impact point will be visually clear even with minor parallax or mechanical offset factors.
Set up your thermal zeroing target at 50 yards. If you are using a heat-based target pad, activate it and confirm it shows up clearly on your display before sitting down at the bench. Dial up your digital zoom to get a clear view of the target center. You are looking for a well-defined aiming point you can return to precisely after the shot.
Position your rifle in a stable rest. The more consistent and stable your shooting position, the more meaningful your single shot will be. An unstable position introduces human error that has nothing to do with the scope's zero. Use sandbags, a quality bench rest, or a bipod with a rear bag for maximum stability.
Step 4: Fire One Round and Identify the Impact Point
This is the core of the how to zero thermal scope process. With your scope stable, your reticle centered on the target, fire one carefully aimed shot. Do not rush this trigger pull. A poorly executed shot will make your zero adjustment meaningless because you will be chasing shooter error rather than correcting a true offset.
After firing, remain still in your position. Do not move the rifle. Keep your eye at the scope. A fresh bullet hole in a zeroing target will show as a heat signature briefly after impact due to the friction and energy transfer of the projectile. On a good thermal zeroing target, this contrast will be visible for several seconds, giving you time to read the impact position.
Use the digital zoom on the ThOR LT 320 to get a closer look at the target. Identify where your bullet impacted relative to your intended point of aim. Note the direction and approximate distance of the impact point from where your reticle was centered. This is the information you need for the reticle adjustment in the next step.
If you are having trouble seeing the impact point clearly, have a partner with a tablet or smartphone connected via ATN's Wi-Fi viewing feature help you identify the hit. Two sets of eyes on the thermal image make this process significantly easier, especially for first-time users.
Step 5: Access the One Shot Zero Menu
Now navigate to the zeroing function in the ATN ThOR LT 320's menu system. Using the 3-button control interface, access the main menu and navigate to the Zero or Reticle settings. The ThOR LT 320's One Shot Zero function allows you to move the reticle on screen to match your bullet's actual impact point, rather than adjusting the optic's physical windage and elevation as you would on a traditional scope.
Once inside the Zero menu, you will see your current reticle position displayed against the thermal image. Use the directional controls to move the reticle to the exact position where your bullet impacted. Move it precisely over the heat signature of your impact point. Take your time here. This is the moment where precision matters most in the entire process. Small errors in reticle placement at this step will translate directly into missed shots at hunting distances.
When you have the reticle positioned exactly over your bullet impact point, confirm the adjustment and save the zero to your current weapon profile. The scope has now recalibrated its zero based on real-world bullet impact data from your specific rifle, ammunition, and environmental conditions at the time of the shot.
Step 6: Confirm Your Zero at Full Distance
One shot at 50 yards gets you very close, but confirming at your intended hunting distance is always worth doing. Move your target out to 100 yards, or whatever distance you selected as your hunting zero in your weapon profile settings.
Take a second carefully aimed shot at your thermal target. Review the impact location relative to your point of aim. In most cases after a proper one-shot zero at 50 yards, your 100-yard impact should be within an inch or two of your intended point of impact. Minor fine-tuning at this stage is a straightforward adjustment through the same zero menu.
If your impact is consistently and significantly off in one direction, it is most likely due to one of three things: an inconsistent shooting position during your initial zero shot, a mounting issue with the scope, or a target identification error in step five. Review each of these before assuming the scope itself has a problem. The ThOR LT 320 is a reliable, well-tested platform. Zeroing issues at this stage are almost always user or setup related.
Once your 100-yard confirmation shot is on target, you are zeroed. Save the profile one final time to ensure your adjustments are locked in memory.
Step 7: Save Your Profile and Label It
This step gets skipped more often than it should. After confirming your zero, go back into the weapon profile settings and verify the profile is saved and clearly labeled with the rifle name, caliber, or whatever identifier makes sense for your setup. If you are running the ThOR LT 320 on multiple firearms across a season, clear labeling prevents you from accidentally shooting with the wrong profile active.
The ability to save and instantly switch between weapon profiles without re-zeroing is one of the legitimate workflow advantages the ATN platform offers hunters who run multiple setups. But it only works if those profiles are accurate and properly saved.

Common Zeroing Mistakes to Avoid
Even experienced shooters make avoidable errors when zeroing a thermal scope for the first time. Here are the most common problems and how to stay ahead of them during your ATN ThOR LT 320 review 2026-informed setup session.
- Using a paper target without thermal contrast: Standard paper targets do not show up well on a thermal display unless there is a significant temperature difference between the target and the background. Always use a purpose-built thermal target or a heat-generating reference for your zeroing session.
- Firing from an unstable position: One-shot zero only works if your single shot is representative of your true aim. Shooter wobble or an unstable rest defeats the entire process. Bench rest or quality bipod support is non-negotiable.
- Zeroing with a different load than you hunt with: Different ammunition produces different points of impact. Zero with your hunting load. Switching loads after zeroing will shift your impact point and require re-zeroing.
- Skipping the confirmation shot: One-shot zero is highly effective, but a confirmation shot at your hunting distance gives you the confidence that your zero is real and not the product of a flukey first shot or a misread impact point.
- Not saving the weapon profile: Confirmed zero data that is not saved to a named profile can be lost if the scope is reset or switched to a different profile accidentally. Always verify the save after zeroing.
Tips for Getting the Most Out of Your ThOR LT 320 Zero in the Field
A proper zero is the foundation, but there are a few additional habits that keep your zero reliable across hunting seasons and changing conditions.
Check Your Zero Periodically
Any significant impact, a drop, a hard bump against a truck door, or a fall during a stalk, is a reason to verify your zero before your next hunt. Digital scopes are generally more resilient to shock than traditional scopes with adjustable turrets, but the mounting hardware is still subject to the same physical forces. A quick verification shot at the beginning of each season takes five minutes and eliminates doubt at critical moments.
Use Color Palettes to Your Advantage During Zeroing
The ThOR LT 320 supports multiple color palette modes including White Hot and Black Hot. During zeroing, experiment with both to see which gives you the clearest contrast on your specific thermal target. White Hot tends to show warmer objects as bright against a dark background, which many shooters find easier to read for precise reticle placement during the zero adjustment step.
Let the Scope Warm Up Before Zeroing
As mentioned in the step-by-step process, a few minutes of warm-up time after powering on the scope allows the thermal sensor to reach a stable operating temperature. A sensor that is still in its initial warm-up phase may shift slightly as it stabilizes, which can affect zero precision. Power on, wait two to three minutes, then begin your session.
Use Wi-Fi Connectivity for a Second Opinion on Impact
ATN's built-in Wi-Fi lets you stream your scope's live view to a smartphone or tablet. Having a hunting partner watch the display on a larger screen while you fire your zero shot makes impact identification significantly easier. Two people analyzing where the bullet hit on a clear phone screen is far more reliable than one person trying to read a small display while still in a shooting position.
Why the ATN ThOR LT 320 Remains the Best Thermal Scope Under 1000
The combination of an effective digital zeroing system, reliable thermal imaging performance, multi-profile storage, and an intuitive 3-button interface is exactly why the ATN ThOR LT 320 continues to hold its position as the best thermal scope under 1000 in 2026 for serious predator and hog hunters.
Competing options in this price range often sacrifice either the zeroing workflow or the display quality. The ThOR LT 320 does not make you choose. The One Shot Zero feature alone represents a meaningful time and ammunition savings over the manual click-and-verify method required by thermal scopes that lack digital zeroing capability.
For hunters who want to step up to even more capability while staying within the ATN ecosystem, the ThOR 6 series and ThOR 6 Mini bring the Zeroing Freeze feature into the workflow. Zeroing Freeze pauses the thermal image at the moment of impact, giving you a static frame to work with while you adjust the reticle. There is no race against fading heat signatures, no rushing. You see the impact, freeze the frame, move the reticle, confirm, and save. It is the most refined zeroing experience available in a thermal riflescope at any price point in 2026.
The ThOR 6 Mini, in particular, brings that capability into a compact package weighing under 500 grams with 6th Generation thermal performance including SharpIR AI-enhanced imaging and OLED display technology. For hunters who have outgrown the LT series or need maximum capability in a lightweight build, the ThOR 6 Mini is the natural upgrade path without leaving the ATN platform your zero workflow is already built around.
Final Thoughts on Zeroing the ATN ThOR LT 320
The ATN ThOR LT 320 specs give you everything needed to execute a precise, reliable one-shot zero when you follow the right process. The technology does the heavy lifting. Your job is to fire one clean, stable shot, correctly identify the impact on your thermal display, and move the reticle to match. That is it. From there, a single confirmation shot tells you whether you are dialed in or need a minor tweak.
This is not complicated, but it does require preparation, the right target, a stable shooting position, and patience during the reticle adjustment step. Cut corners anywhere in the process and you will waste time and ammunition. Follow the steps laid out in this guide and you will walk away from the range zeroed, confident, and ready to hunt.
Whether you are running the ThOR LT 320 as your entry into thermal hunting or using this thermal scope setup guide to sharpen your process before a high-stakes predator season, the steps are the same. Set up right. Shoot once. Zero precisely. Hunt effectively. That is what the best thermal scope under 1000 on the market in 2026 was built to help you do.